Introduction
We’ve been tasked to analyze a board game of our choice. The assignment requires us to look at the core systems (objects, behaviors, relations etc.) that drives the game and the correlation between these systems.
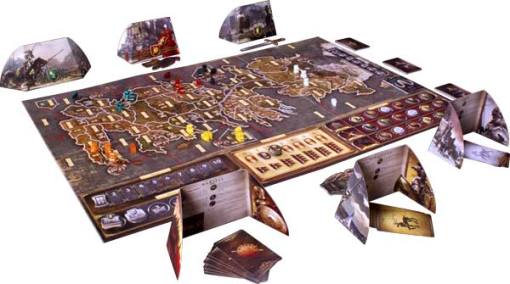
– A Game of Thrones: The Board Game
A Game of Thrones is a board game for 3 – 6 players (preferably 6 players). Each player is assigned a House (A Team if you will), that dictates their starting position and their strategical approach. The game is essentially about conquering the majority of Westeros (the Land of which the Game of Thrones series takes place), by conquering castles and fortresses by battling it out and forming pacts with rival houses.
So, let’s get in to the mechanics (and in order for me to do this, I’ve got to get pretty minute with my descriptions):
– Houses
As mentioned, each player is assigned a House; House of Starks, House of Baratheon, House of Lannister, House of Grejoy, House of Tyrell or the House of Martell. Theese cards represent the player’s team that they will be playing as during the game. The house cards tells the player where on the map they will be starting out, how many units they will start with (and where they start) and where on the influence track (I’ll highlight parts from now on that will be touched upon later on in the analysis) they start. Each individual house also has their own House Cards, that are used as battle modifiers during engagements against rival houses.
– Influence track
The influence track that is a system that is deeply integrated with the resource management system of the game. There’s three distinct tracks on the influence track. They are the Iron Throne, The Fiefdom and the Kings Court.
- The Iron throne: The number one player on the iron throne is the decider of draws (ex. Two players bid 4 tokens on a wildling attack, the king then gets to decide who wins) and also the first player who gets to do his turn during the planning phase. This means that the hierarchy of “who-gets-to-go-first” is decided upon the hierarchy of where you’re ranked on the iron throne
- Fiefdom: Gains +1 Attack during battles. Depending on how you are placed on the Fiefdom track (the higher the better) the player will win if he’s above the other player during a battle draw.
- Kings Court: This might be the most interesting influence track. The top four players gets to put ‘better’ order tokens during the planning phase, with the leader of the track gaining the ability to watch the top card of the Wilding Cards. This player may decide to fool the other players to reveal that information or lie depending on his or hers strategy. The Kings court also gives the player the ability to change one of his or her order tokens after all order tokens has been revealed during a planning phase (This means, that a attack that would’ve turned out to be foolish, or an attack that was anticipated by the Kings Court leader may be changed to something else more beneficial, as the whole order token system boils down to anticipation of your rivals actions, I’ll talk a bit more about this further down).
Let’s get in to how the actual Game Surface looks and works:

Game Space
The game space is where the decisions of your actions takes place. In order to Win, the player has to conquer 7 castles or keeps, or have the most keeps or castles at the end of the 10th turn (which is the maximum amount of turns). As you can see on the pictures, there’s different symbols in each Province (provinces are captured by Units, and are considered yours when you place a Power Token on top of it). As you might notice, certain areas has choke points and tight places to vie for. The ability to think forward and plan your next 2-3 moves are paramount for the player in order to anticipate the movement of your rivals actions. Not having a solid plan is detrimental to your war effort. Example; I’ve got three castles, my nearest enemy has 5. Is it logical for me to assume that he will conquer my castles or will he try to expand elsewhere as I might not be a direct threat to him. Anticipating your enemies next action is at the very core of the game. Do I Strike now, or do I wait a turn and try to create a Smoke and Mirrors situation whereas it looks like I’ll be attacking another province?.
Now, there’s several different Icons on the board that correlates with your war effort, which also means that certain provinces are worth more than others, and some provinces are easier to claim early on, but worth less than a more risky province that is close to a rival.
Let’s take a closer look at what the different icons means:
- Crowns: These provinces allows the player to place Consolidate Power Order Tokens, giving the player an extra power token per crown represented on the province.
- Barrels: Amount of Supply (I’ll explain this when I get to the Fighting aspect of the game)
- Small Castles: Gives the player +1 on the Victory track. Also allows the player to muster 1 points of units.
- Large Castles: Gives the player +1 on the Victory track. Also allows the player to muster 2 points of units.
- Ports: Allows the player to build ships.
On top of the board there’s a Wilding Counter ( 0 – 12 ) with a shuffled deck of Wilding Cards attached to it. During the Westeros Phase (the beginning of each round), three cards are drawn with random effects that will change the course of the next phase (i’ll get in to this in a bit). On these cards there are sometimes printed a wilding icons, moving the counter up one step. As soon as one of the Westeros Cards turns out to be a Wilding Attack, the counter at the top represents the amount of Power tokens that has to be spent in order to counter this attack. Each player then secretly bets X amounts of power tokens, and all the players then reveals how much they have “bet”. If the players fail (as in they do not bet enough Power Tokens to clear the attack) they receive a negative effect: One for the lowest bidder, which is usually a pretty massive negative effect (ex. Losing two units anywhere on the map), and the rest get a milder, but still negative effect. If the bet surpases the wilding counter, the highest bidder gets a reward. This creates an interesting hit-and-miss system that is tied in with the resource system. If you’re certain that the group might clear the wilding attack without your effort, you might as well save the your tokens, but what if they don’t and you turn out to be the lowest bidder? Also, betting high on this might give you a reward, but next round there’s always the chance of being a betting turn for the Influence Track (this all depends on the Westeros cards being drawn at the beginning of the round). This serves to give players in unfavorable positions a chance of recovering themselves; if they’re willing to take the risk.
Which brings me to actually explaining how the moves on the board takes place:
Phases
Westeros Phase
At the beginning of each round (apart from the very first round, which immediately starts at the planning phase), the Westeros Phase is played out. This simulates the day to day life in Westeros. Three cards are drawn, each with a random event that will alter the course of the upcoming round. These could be that you may now update your amount of Supply to correlate with the amount of supply you have acquired on the game space, or perhaps one of the cards may state that no support order tokens may be played next round – creating a situation where a players planned attack might be rendered useless. After these cards are played the Planning Phase begins:
Planning Phase
This is going to be a handful, as this is the main strategic and most interactive part of the game.
Each player is equipped with Order tokens. These tokens represent the actions that your units or provinces may take.
Each different token also has different “ranks”. For example, the march order has a -1 attack, +0 attack and +1 attack version. The best versions may only be played if you’re ranked high on the Kings Court influence track (see above.). The top two on the influence track may play three “star” order tokens (the better versions), the 3rd may play two, 4th may play one “star” order tokens and the last two players may not issue any “star” order tokens at all. (Giving an incentive to get higher up on the Kings Court Influence Track).
There’s 3x tokens of different ranks per order.
The following tokens are:
- March Order: Allows the player to move units to provinces that are adjacent to the province where the player put the order.
- Support Order: Allows the units in the province to support an attack or a defence in an adjacent province. (This may backfire once again, as all order tokens are placed upside down, you have to anticipate, or guess I suppose, if this group is going to be attacked or not, as it will not receive any plus in defense or attack. It’s all about risks.)
- Defense Order: May be put in a province that a player suspects is going to be attacked. Gives plus in combat strength.
- Raid Order: Allows a unit to cancel out another players support or consolidate power token in an adjacent province.
- Consolidate Power: This is probably the most interesting one out of the bunch. This token may be placed in each province that a player owns (preferably on a province that has a crown on it), and gives the player one power token and one extra per crown in the province. If you’re far enough up on the influence track, you may put a special consolidate power token to generate an extra unit at a castle.
When all players has placed their order tokens, they are flipped over and then revealed to all other players. Now, as I mentioned earlier, the Kings Court Leader may change one of his tokens if he finds that one of his order tokens may be used better elsewhere after seeing his opponents tokens.
The order tokens are then resolved based on where the players are positioned on the Iron Throne Influence track. This is favorable, as you can ruin your rivals plans if you placed your order tokens smartly, meaning that his turn will be radically changed from what the he originally expected.
If there’s any attacks during the resolving of the planning phase, you jump straight into combat. So let’s look at how the combat system works:

I’m adding a picture here for the soul purpose of keeping you interested in the text. Sorry.
Combat and Units:
Let’s talk a bit about the units first. There’s four different kinds of units, and each are worth a certain amount of “points” and each gives a certain amount of Combat Strength.
The units that each player can create are:
- Footmen: Worth 1 point (meaning that one can be mustered at a small castle, or two at a larger one). Gives +1 Combat strength during combat.
- Knights: Worth 2 points (meaning that one can be mustered at a large castle, or upgraded from a footman for 1 point). Gives +2 Combat strength during combat.
- Boats: Worth 1 point (can only be mustered in provinces that has a port). These are going to need a special little entry below.
- Siege engines: Worth 2 points (can only be mustered at a large castle). Can only attack Castles that has extra defense.
This is where I’ll quickly explain what supply is (the barrels).
Supply
So, as I mentioned earlier, there’s barrels scattered around the map. Each of these icons represent +1 supply for each province that own with one of them in.
Supply determines how many groups(as in, how many provinces you may have units in) of units you may have out on the board at the same time, and how many each group of units can contain. Supply can only be updated to your current amount if a Supply Westeros card is randomly drawn during the Westeros Phase. This means that a player can not rush supplies and muster a gigantic army without first having their Supply Updated.
Let’s get in to how a battle works:
Battles
So, during the planning phase, let’s assume that one player is attacking another player with a +1 march order with one knight and a footman. The province that is being attacked has one footman and a +2 defense token. The total combat strength of the attacker is Footman (+1), Knight (+2), March Order +1 = 4. The defender has Footman(+1) and a Defender Order +2 which equals 3 all in all. The Attacker then has a combat advantage. But this is just the starting point of the battle.
As mentioned earlier, players also have House Cards. These are used for combat.
The House cards have a Combat Strength printed on them and a specialty. The specialty of the cards may be three different things, either a tower, a sword or a personalized bonus. The tower represent that if you’d lose the battle, you won’t loose soldiers based on how many towers are represented on the card. The sword represent that if you win the battle, the amount of soldiers lost on the losing side. And the personalized bonus might be anything from gaining +1 attack per boat in the combat, to – if you win you may be able to do another attack in another adjacent territory.
Now, it’s important to note that after using these cards during combat, they are discarded. So you have to use your cards carefully.
Let’s get back to the combat.
The Attacker had +4 combat strength and the Defender had +3. Each player chooses a card, let’s say the attacker chose a card with +2 combat strength and a sword icon on it. The defender chose a +2 combat strength card with a tower on it.
The attacker now has +6 combat strength, and the defender has a +5 combat strength. The tower will cancel out the sword, so no casualties will be taken by the defender, but the battle is not over.
This is where we introduce the Tides of Battle cards (worth noting is that in the “vanilla” game, this is not a mechanic, but it was added in the edition that we played with). These are randomly drawn cards from a stack, and given out to the players. These cards adds +0 to +3 attack, and may also have sword Icons, Tower icons, and a special icon with a skull on it, that immediately kills another player of the opposing force, even if the other player is the winner of the battle.
So let’s assume that the attacker draws a +2 Tides of Battle card, and the Defender a +0 Tides of Battle card.
The total of the Attacker is now +8 combat strength and the defender is still at +5. The Attacker has won, and may now move his force in to the province and claim it. The defender, who lost, must now retreat to an adjacent territory of his choosing that has no enemies in it. if the player can not retreat, his units is routed and destroyed.
The interesting part about the combat mechanics is that it forces the players to think two to three battles ahead; Do I save my best House Cards for later and take my chances with the Tides of Battle cards? Or Do I go all out and hope that the opposing player do not draw a powerful Tides of Battle Card? Once again, It’s all about risks and rewards, but most importantly it’s about managing your resources carefully and making sure that you have options in the upcoming rounds.
(I’m sorry about this messy explanation. I hope it comes across as at least slightly understandable.)
When the planning phase is over, and all combats have been resolved, the round is over, and a new round begins with the Westeros Phase.

Another picture to spice things up. Keep your chin up!
I’ll now be talking about the single most, in my opinion, important system of the game. The Resource system.
Resource management
As I’ve mentioned several times in the text, there’s another token called the Power token. This is the games resource token.
They are collected by consolidating power in your provinces during the planning phase. (I can’t stress this enough; you either have to collect coins or do an action during that phase, so collecting coins might hinder your expansion by not having troops enough or not moving from a province)
The power tokens are used for several things. They are the currency that you use to bet for the positions on the influence track and for betting on the Wilding attacks. They are also used to control an area. If you move out of an area with your units, you do not longer own that area if you do not put down a power token. Meaning that rapid expansion costs Power tokens, which may result in the player not being able to hold on to their influence track rank.
This system rewards players who balances expansion with consolidating their power in already claimed provinces. An aggressive player might loose too many power tokens to stay on top of the influence track, while a player who solely consolidates his or her power will not be able to expand their territory and/or create units enough to do the aforementioned.
The bets that costs power tokens are also a part of a larger system, that is more abstract, and that is the physical interaction of the players sitting around the table. Do I trust that the other players will help me out? Will the king choose a good position on the influence track for me if I don’t bet enough or anything at all? Can I only trust myself, and therefor spend more coins, or do I have enough allies around me so that I can safely consolidate power without having wasted that order token on being attacked and not being able to properly defend myself.
The trickery, the politics and the drama that surrounds the game itself is half the fun of the game. In my last game, I secured a river crossing, making sure I wouldn’t get flanked. This meant that I was now bordering another player on two fronts. I negotiated a ceasefire that lasted for more than half the game, but when I saw my chance at the later stages of the game, I back stabbed him and stole one of his castles that he had left undefended (while consolidating power there), giving me another castle, which put me at a total of 7 – earning me the victory!
The most interesting system
According to me, the most interesting system is the strategical placement of your order tokens. It becomes a game of brutal poker. What does my foes have in mind? What will their next move be?
By not being able to know if my enemies next move will be to launch a naval assault against one of my undefended castles where I’d desperately need to consolidate power, or perhaps he’s just looking to defend his own border out of the fear of an attack from me, it puts me on alert and forces me to take calculated risks and, more than often, balances the game and creates interesting border conflicts. Is this the turn that I will be attacked? How does the conflict further down look, will it spread to my lands, do I take the chance this turn to assault my enemies while he’s busy, but then again I might be attacked this round and I have to make sure that I support my defending units. This is, after all, what Game of Thrones is all about.
This is for me, without a doubt, the system that makes the game tick, and combined with the resource system it creates a interesting blend of strategical choices and politics.
Target Group
The game is targeted, according to the box that the game comes with, to teenagers from 14 and up.
I’d argue that the game is not specifically targeted towards fans of the series (although that greatly increases the value of the game, as it’s aesthetically pleasing to look at, and on top of that it has some great references to the game). The reason for this is that it’s just a risk with deeper and more interesting mechanics. It’s not a requirement at all to understand the lore of the series in order to understand what you’re doing. So, 14+ seems like an apt age, but I’m still opting for the game to more of a 18-20+ game, as the game’s subject matter is quite heavy, and all of the mechanics might be better suited for an audience who has already had a lot of experience playing similar games.
Conclusions
In conclusion, I really enjoyed this game. As I mentioned earlier, I’m thoroughly impressed at how the Planning System ties in with the resource management system. It creates an interesting mix of risky decisions and dicey situations that you have to plan several steps ahead. The fact that nothing can ever be certain, especially with the randomness of the battles with the tides of battle cards, and the Westeros Cards that determine how the next planning phase will work out.
Adding on top of that a physical layer of intrigues, politics and devious deeds that each player can engage in. This creates an interesting mix of strategy and politics – definitely mirroring the books/series.
If there’s one thing I’d like to critique, it’s that mustering/creating armies doesn’t really feel like creating an army. The supply limits are small, and you’re often not able to focus on huge battles, which is something I’d like to see. The game could use a bit of more mechanics regarding units and combat, even though it IS still pretty good and interesting. But, seeing as how they’ve captured the feel of the original series and books, the combats can sometimes feel underwhelming compared to the grandness of the map.
That’s all for now. I hope you enjoyed my little analysis/review of A Game of Thrones: The Board Game.
Take care!


